SQL Data Connector
Setting Up SQL Export Connectors
Setting up an SQL Server export connector in DPL Studio requires identifying the SQL Server and providing the required authentication details.
Steps to Set Up an SQL Export Connector
-
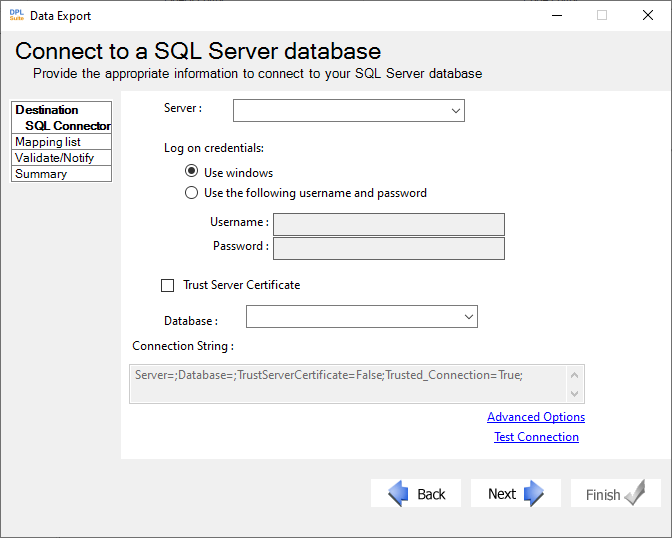
In the Set Destination Connection dialog of the Data Export Wizard, select SQL server Data Connector.
-
In the Server dropdown list:
- Select the SQL server that hosts the database.
- Click Refresh to rescan and display available servers if the required server is not listed.
- if the server still does not appear, manually enter the fully qualified network path of the server.
- Under Login Credentials, choose one of the following authentication methods:
Use Windows Authentication
Select this option to use Microsoft Windows authentication.
a. DPL Studio uses the current Windows user credentials for authentication.
b. The SQL Server administrator must configure the server to allow Windows authentication.
Use the Following Username and Password
Select this option to manually enter authentication details.
a. Enter the required Username and Password.
b. Blank passwords are allowed if the data source does not require a password.
-
Use the Database dropdown list to select the database you want to access.
-
Optionally, enable Edit Connection String to manually enter a connection string. a. Tables
-
Configure the Query Timeout value to define how long DPL Studio should wait before returning a timeout error.
-
Click Test Connection to verify the connection to the SQL Server database. (If the connection fails, verify that the connection details are correct. Incorrect credentials, spelling errors, or case sensitivity may cause connection failures.)
-
Click Next to proceed to the next step in the wizard and configure the table mappings between the source and destination files.